<!-- WP QUADS Content Ad Plugin v. 3.0.5.1 -->
<div class="quads-location quads-ad1" id="quads-ad1" style="float:none;margin:10px;">

</div>

<p class="wp-block-wd-paragraph wd-a55041d9">When unexpected severe weather strikes, daylight fades faster than anticipated, or an injury leaves you stranded on the trail, time is your most critical resource. In a survival scenario, hypothermia or exposure can set in remarkably quickly—sometimes within minutes if you are wet, exhausted, or facing high winds and dropping temperatures.</p>


<p class="wp-block-wd-paragraph wd-b396ea44">Knowing how to rapidly construct a secure emergency shelter using basic gear or natural materials can mean the difference between a minor misadventure and a life-threatening crisis.</p>


<p class="wp-block-wd-paragraph wd-c75e3349">Here is a step-by-step guide to putting up a reliable emergency shelter in 10 minutes or less.</p>


<h2 class="wp-block-wd-title title wd-a9762cd4">The Rule of Threes: Why Speed Matters</h2>


<p class="wp-block-wd-paragraph wd-b8117193">Survival experts often cite the &#8220;Rule of Threes&#8221;: you can survive 3 weeks without food, 3 days without water, but only <strong>3 minutes without shelter</strong> in extreme environmental conditions. When you are caught in freezing rain, wind, or blistering sun, waiting until dark or fumbling with a complicated tent setup is a dangerous mistake.</p>


<p class="wp-block-wd-paragraph wd-ab1c51e2">Your goals for a rapid-deployment shelter are simple:</p>


<ol start="1" class="wp-block-list">
<li><strong>Block the wind</strong> (wind chill accelerates heat loss drastically).</li>


<li><strong>Insulate from the ground</strong> (conduction steals body heat 20 times faster than air).</li>


<li><strong>Keep dry</strong> (moisture destroys your body&#8217;s natural insulation).</li>
</ol>


<h2 class="wp-block-wd-title title wd-41015d60">The 10-Minute Tarp Lean-To (The Gold Standard)</h2>


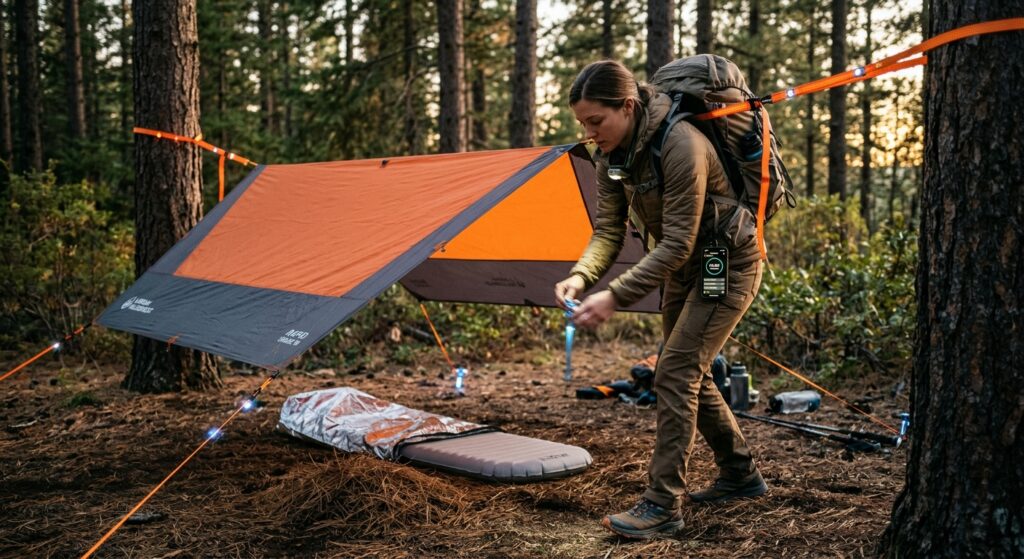
<p class="wp-block-wd-paragraph wd-32c99177">If you are carrying a standard emergency tarp, a space blanket, or even a heavy-duty trash bag and some paracord, the <strong>lean-to</strong> is your fastest, most efficient option.</p>
<!-- WP QUADS Content Ad Plugin v. 3.0.5.1 -->
<div class="quads-location quads-ad2" id="quads-ad2" style="float:none;margin:10px;">

</div>


<h3 class="wp-block-wd-title title wd-2fd37e9e">What You Need:</h3>


<ul class="wp-block-list">
<li>A lightweight tarp, plastic sheeting, or emergency space blanket (approx. 8&#215;10 feet is ideal).</li>


<li>20–30 feet of paracord or utility rope.</li>


<li>Two sturdy trees or natural anchor points about 6 to 8 feet apart.</li>


<li>Four stakes (or improvised rocks/logs).</li>
</ul>


<h3 class="wp-block-wd-title title wd-c6ff6278">Step-by-Step Breakdown:</h3>


<ul class="wp-block-list">
<li><strong>Minute 1–3: Locate and Anchor the Ridge Line</strong> Find two living trees, sturdy branches, or trekking poles that are roughly the width of your tarp apart. Tie your paracord tightly between them at about knee-to-waist height. If you want more headroom, bring it up to chest height, but a lower profile keeps the interior warmer.</li>


<li><strong>Minute 4–6: Position the Tarp</strong> Drape your tarp or plastic sheeting over the paracord line so that one side is longer than the other. Position the shelter so that the <strong>backside (the lower side) faces into the prevailing wind</strong>. This creates a natural windbreak and prevents drafts from sweeping underneath.</li>


<li><strong>Minute 7–8: Stake Down the Corners</strong> Pull the bottom corners of the tarp taut and peg them down using tent stakes, heavy rocks, or buried sticks. If you don&#8217;t have stakes, weigh down the hem of the tarp with large stones or logs to seal out ground drafts.</li>


<li><strong>Minute 9–10: Insulate the Floor</strong> Never sit or lie directly on bare earth. Gather dry leaves, pine needles, moss, or dry grass to create a thick insulating mattress inside your shelter. If you have a sleeping pad or backpack, lay it on top of your debris bed.</li>
</ul>


<h2 class="wp-block-wd-title title wd-2620ca6e">Alternative: The Natural Debris Lean-To (No Gear)</h2>


<p class="wp-block-wd-paragraph wd-48caa78e">If you find yourself stranded without a tarp or man-made materials, you can build a debris shelter using fallen timber and natural forest cover.</p>


<ol start="1" class="wp-block-list">
<li><strong>Find a Lean-To Anchor:</strong> Find a sturdy branch or small fallen tree resting against a standing tree trunk at about hip height.</li>


<li><strong>Build the Ribs:</strong> Lay numerous long branches and stout sticks against the horizontal spine at a 45-degree angle, placing them close together to form a sturdy skeletal framework.</li>


<li><strong>Thatch the Roof:</strong> Pile a thick layer—at least 1 to 2 feet deep—of pine boughs, ferns, leaves, and moss over the framework. Start from the bottom and work your way up like shingling a roof so rain and moisture run off rather than leaking through.</li>


<li><strong>Crawl In:</strong> Stuff the interior with a deep layer of dry debris to insulate yourself from the cold ground.</li>
</ol>


<h2 class="wp-block-wd-title title wd-3d918ffa">Pro-Tips for Emergency Shelter Success</h2>


<ul class="wp-block-list">
<li><strong>Smaller is Warmer:</strong> Your body heat is what warms the interior space. Do not build a shelter larger than you actually need to lie down or sit comfortably. Excess air volume requires more body heat to warm up.</li>


<li><strong>Ground Insulation is Non-Negotiable:</strong> Hypothermia often occurs because the cold ground draws heat directly out of your body. Prioritize thick ground cover over overhead cover if you are forced to choose.</li>


<li><strong>Keep Dry:</strong> Avoid sweating excessively while building your shelter. Shed layers before you begin working so moisture doesn&#8217;t soak into your base layers, leading to rapid chill once you rest.</li>
</ul>


<p class="wp-block-wd-paragraph wd-1b14e704">Preparation is ultimately about mindset. Practice setting up your emergency gear in your backyard or local park with a timer. Once muscle memory takes over, you&#8217;ll be able to secure your safety net long before the clock runs out.
<!-- WP QUADS Content Ad Plugin v. 3.0.5.1 -->
<div class="quads-location quads-ad6" id="quads-ad6" style="float:none;margin:0px;">

</div>


How to Build an Emergency Shelter in Under 10 Minutes